Quick and easy crochet placemat pattern for free (beginner-intermediate level)

If you have been looking for Urban Outfitters inspired decor to spice up your dining table or tea drinking rituals, this is it! Your search is over with this free crochet placemat pattern. This crochet placemat is big enough for a large tea mug or a small bowl and you can whip up 8 of them with just 1 skein of yarn.
Without further ado, let’s get making!
Level: beginner-intermediate
stitches you need to know: double crochet, bobble stitch and slip stitch
Materials:
1 skein of yarn. For this project, I use Anette Eriksson eco-cotton xl in ecru
6.5mm crochet hook (but you can use other sizes if your yarn is thinner.
Darning needle to fasten off loose ends.
Stitches and Abbreviations:
ch(s): chain(s)
sp: space
yo: yarn over
dc: double crochet
slip st: slip stitch
rep: repeat
“2dc or 3dc or ‘x’ dc” means dc 2, 3 or x amount into the same space
“dc 2″ means dc into the next 2 stitches (example: dc 7 means dc into the next 7 stitches)
Special Abbreviation:
Bobble: work 4 dc into the same sp, leaving the last loop of each dc on hook, yo and draw through all 5 loops on hook.
Gauge: 12 cm square = round 1 – 3
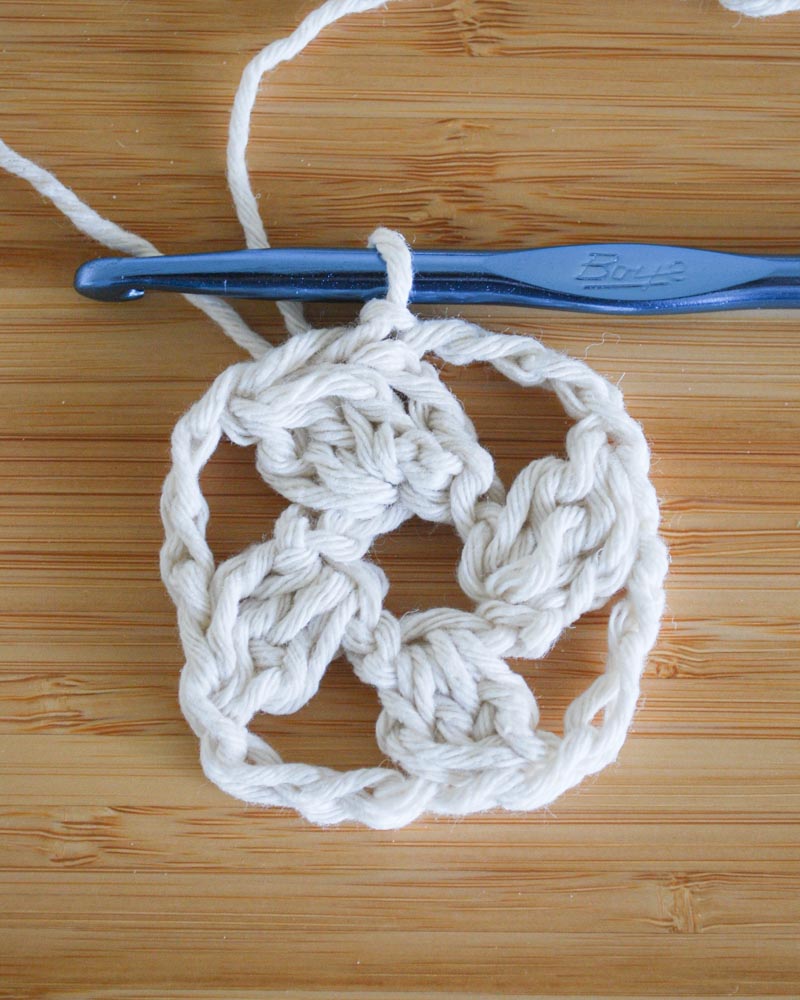
Base ring:
Ch 8, slip st to join the last ch to the first ch.
Round 1:
This round is where you’re going to use the bobble stitch. Don’t worry, the next rounds are just dc and slip st! For the purpose of this project, I’m going to call the base chain we just made base “ring” as to not confuse the chains we are making along the way to the one that we’re supposed to stitch into in this round.
Ch3, 3dc into the 1st ring (not the slip st) holding back the last loop of each dc, yo and draw through all 4 loops on hook (this is the first bobble). Ch4, bobble into the 3rd ring leaving 1 ring in-between. Ch4, bobble into the 5th ring leaving 1 ring in-between. Ch4, bobble into the 7th ring leaving 1 ring in-between. Ch4, slip st to the top of the 1st bobble.
Round 2:
note: ‘ch-4 sp’ is the ch4 you made before in the round 1 after each bobble st. It’s basically the ‘border’ of the round 1.
slip st into the next ch-4 sp, ch3 (count as 1 dc), 2dc, ch3, 3dc, skip 1 sp *1 dc into the top of the next bobble, skip 1 sp, 3dc, ch3, 3dc into the next ch-4 sp, skip 1 sp* rep from * twice more. 1dc into the top of the next bobble, slip st to top of ch-3.

Round 3:
note: ‘ch-3 sp’ is the ch3 you made before in the round 2 in-between the 3dcs.
ch3, 1dc into each of next 2 stitches (dc2) , 2dc, ch3, skip 1 sp, 2dc into the next ch-3 sp. * dc 7 , 2dc, ch3, skip 1 sp, 2dc into the next ch-3 sp* rep from* twice more, 1 dc into each of the next 4dc, slip st to the top of ch-3. Fasten off. Using a darning needle, hide any loose ends.

That’s it the main body of the placemat is done! Now you can either stop here or move on to adding the fringe all around the edges.
Making the Fringe:
wrap the yarn around a card until you have enough yarn gathered, then cut along one of the edges of the card. Then cut the yarn in half. This is the length of your fringe. For this project, I’m using a 10cm card so my fringe is about half of that when fastened off.
Take one strand of yarn, fold in half, take the crochet hook and poke through the edges. Pull through the yarn halfway, yo both end and pull through to fasten off. Repeat for each stitch along the edge. For one stitch on the edge, I use two strands of yarn (4 as they’re folded in half) so I get more fluffy fringes. Once the fringe is done, take a brush and comb the yarn to loosen up the strands. Once you got your fluffy fringe, trim to neaten the edges.
That’s it, you’re done!
I hope you find this pattern easy to follow. If you have any questions, please leave a comment below. I will try my best to answer them.
Happy making!
Pin It for later


I appreciate the clear and concise way you’ve presented the information. This was very helpful!
[…] Check out other free beginner friendly crochet pattern here. […]
[…] sincerelyant […]
[…] Check out other easy crochet projects here […]